Email List Building Strategies – How to Build a Buyer List with Affiliate Sales
Watch the video below and then read the simple instructions under that for further clarification. Enjoy 🙂
Today I’m going to share the most ninja of my email list building tips – “how to build your buyers list with affiliate sales”.
Because as you probably know, with affiliate marketing usually only the vendor gets to collect the product buyer’s email address while you, the affiliate, collects the commission for the sale.
That’s great if you’re the product vendor – you end up with a huge list of happy buyers. Not so great though for you because although the commission was nice, you don’t get to sell to them ever again.
This sucks but with this ninja tactic I’ll show you how to build your buyer list from affiliate sales.
So the first thing you’ll need is an auto-responder. I use Aweber but any of the others will do just fine.
If you don’t have an auto responder, I recommend Aweber because for value for money, ease of use and deliverability, it’s tops. Click the button below for a FREE one month trial. PS: Note that it says $19 per month, but if you pay 3 monthly like I do then it’s only $49, so $16 a month….
OK, moving on…
Create a New List:
So the first thing we’ll do is create a new list. In Aweber, just go to top right and click “Manage Lists”, then click “Create a List”.

.
On the first page where it says “Setup Your List”, – just leave all that stuff basic. You only need to put your name and then click “Next Step”
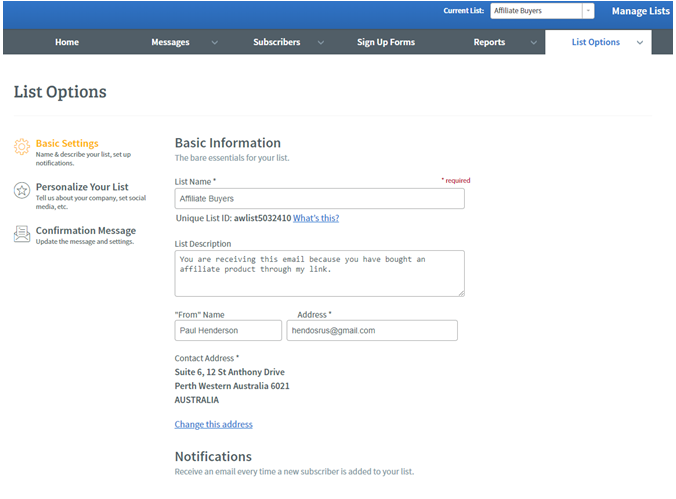
- Call your list “Affiliate Buyers”.
- For the description just put… “You are receiving this email because you have bought an affiliate product through my link”.
- It’s as simple as that. Now click “Next Step”.
We won’t be using confirmed optins so just click “Approve my Message & Create List”.
So now we have our list and the first thing we’re going to do is hover over “List Options” and click on “List Settings”.

At left click “Confirmation Message” and we’ll turn off that feature by scrolling down and setting the ‘confirmation’ options to “OFF” and then confirm that action by selecting “YES” when prompted.
This is super important so be sure to do this correctly. Done? Ok, Click on “Save Settings”
Ok, let me now just clarify something…
You’re going to have ONE email list for ALL your affiliate buyers, and the way you achieve that is by having a unique SIGN UP or OPTIN form for each and every product that you promote to your list.
You won’t need any follow up messages or anything like that.
Ok, so from inside your list (current list set to Affiliate Buyers), click “Create a Sign Up Form”.
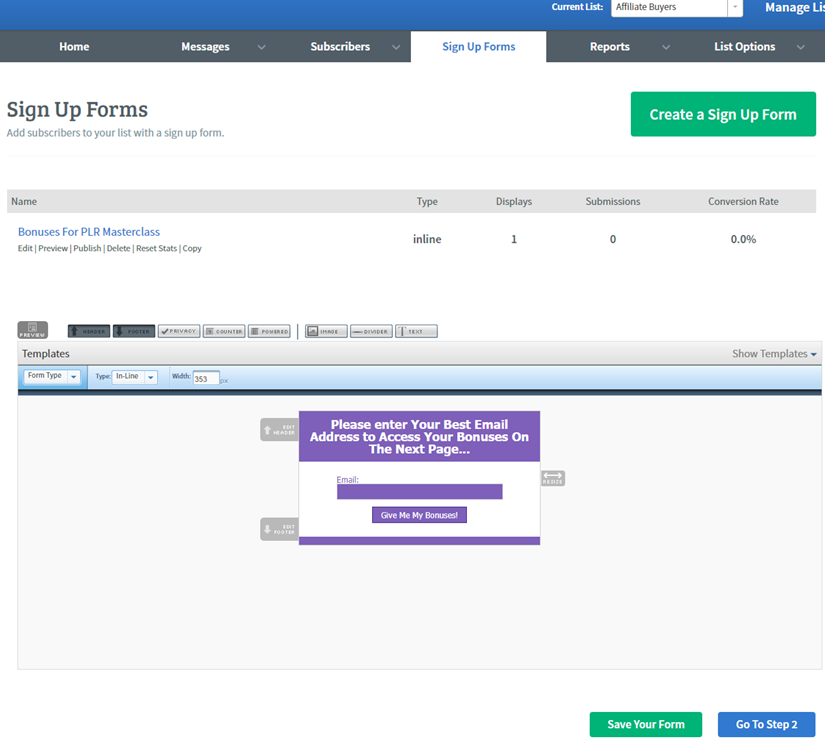
Pick a simple template and just leave the ‘Email Address’ field and the ‘Submit’ button – you can get rid of the rest.
At this stage, it might be worthwhile to explain that we’re going to be getting people onto our list by giving away bonuses – that’s why they’ll be buying through our link. And before they can access their bonuses, they need to enter their email address into our form – the one we’re creating right here.
OK?
Good, let’s continue…
Ok, on your simple template edit the header and button so they look something like I show in the pic above.
If you think this looks ugly, then don’t worry. The customer has already bought the product and now they just want their bonuses, so you don’t have to worry about how pretty this is – it doesn’t matter.
Click “Save” and go to Step 2.
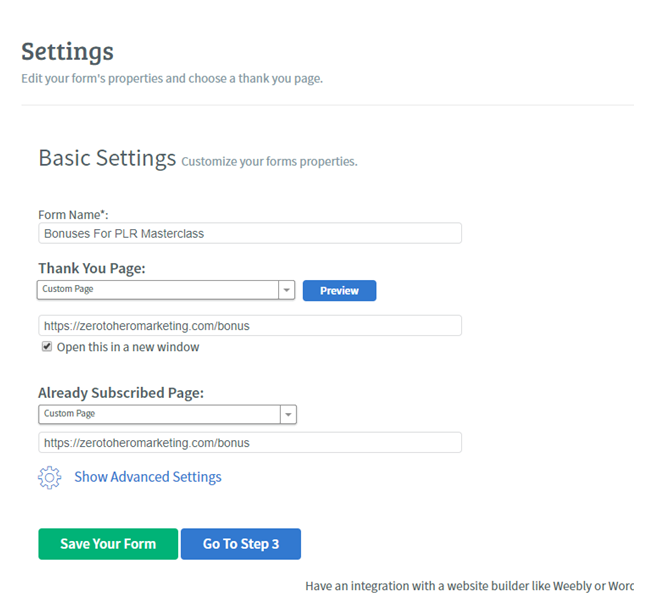
Call your form simply – “Bonuses for Product Name”
For your “Thank You” page choose a custom page and insert the actual URL of the bonus delivery page which will in all probability be a page on a site you own.
For the “Already Subscribed” page, enter exactly the same URL so that your customer can access his freebies at any time in the future.
Click on “Save” and goto Step 3.
PUBLISH:
So now we’ve reached the “Publish” section. Actually you don’t even need to grab the code and put it anywhere because it will be fine just to have AWeber host the whole page.
That being said, click the last option – “Have Aweber Host My Form” and notice that a link is provided underneath.
Copy the link (as in right click and copy – I don’t mean write it down, lol) – and now go over to the product you’re going to be promoting on JVZoo or W+.
They both work exactly the same, so I’ll just do the W+ option here…
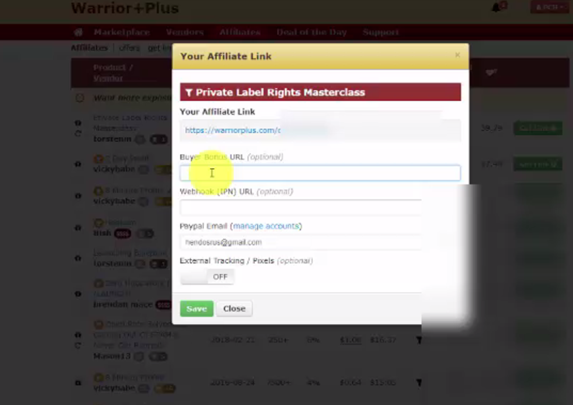
You can see where it says “Buyer Bonus URL”?
You can? – good. Paste the link you just copied from your auto responder into that field.
So now, after your affiliate customer purchases through your link, they’ll be sent an email with access instructions for the product as usual, and also details on how to collect the promised bonuses. All done automatically with no further intervention from you needed.
If you want, (and you should), you can test the part of this system that happens after the customer has purchased like this….
Just paste the AWeber hosted URL into your browser. The simple Aweber form displays in a new tab. You enter your email into the form as if you were the purchaser. Check you got added to the list you just set up. And finally, did you get shown the bonus delivery page from where you can download your bonus products.
If that all worked – you are done!
Hope you enjoyed this good peeps, it works a treat. If you got value from it please feel free to comment below and share on facetoob and your other fave social sites.
Until next time,

Paul Henderson
